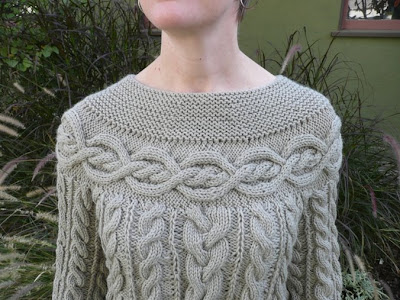
Call the press... throw a party ... the cable luxe tunic is done AND it fits!

This was a project that I was really skeptical about when I first started reading about it. Everyone (and I'm not exaggerating, every post I read about it) talked about the problems with the pattern. Nevertheless, I was literally compelled to cast on. It was the yoke and the cables -- I'm a sucker for texture and cables just do it for me.

So I started with the cabled yoke -- which is what initially drew me to this sweater. Love the garter stitch top and the cabled section. Once that was done it was down to the body. I loved the top but will admit I wasn't in love with the body as it finished up.

After a bit of a break, I picked the sweater back up and started on the sleeves. After at least one false start (maybe two, I've repressed the memories), off I went to sleeve island. The first sleeve was slow. You know the feeling (I know you do), you knit and knit and knit and you feel like you're no closer to the end. Then at knit-night, suddenly I was at least half way through the first sleeve and I felt the end was possible.

A dedicated weekend of knitting and one sleeve done! Now I love the sweater. Having that long sleeve just pulled it all together. The second sleeve came together in no time and Saturday I cast off and wove in the ends!
I had fun with this sweater and am pleased with the finished project. I made mistakes along the way (the slipped "stripes" between the cables -- see my last post), but also learned how to fix my mistakes. I made a few modifications to the pattern, based on the helpful hints I picked up online and am just tickled pink with the outcome.
Final verdict... a winner!
Cable Luxe Tunic (a Lion Brand pattern)
size Small
Cascade 220 (7? skeins)
Color 8407 (a greenish grey) Lot 0999
US 8 circular needles
Cast on May 14, 2008
Finished October 18, 2008
Modifications:
Quite a few.
I started with the cabled yoke which is knit flat from side to side and then seamed together. I next picked up stitches and knit the garter stitch top of the yoke. With these two parts I could try the sweater on as I went to make sure the fit was working. From this point forward, I knit the rest of the body of the sweater in the round. I picked up stitches from the bottom of the cabled yoke and knit the whole body of the sweater in the round. By knitting in the round I was able to fit another cable repeat under each sleeve (there isn't a stretch of filler as would be the case if knit flat and seamed). I also knit the sleeves in the round. With a little trial and error I simply started with the right number of stitches rather than doing the strange increase the pattern recommended. I also calculate the number to cast on so I could do an even set of cable repeats around the whole sleeve (again no filler stretches where the seam would be).
1st an errata from the pattern -- row 11 of yoke: p7, 3/3LC, 3/3RC, p7
Other changes... all found by checking out bulletin boards and suggestions given by others.
For the 3/3 LC Cable: Row 3 knit as a 3/3 LC after the center cable, Row knit as a 3/3 RC before the center cable
For the 4/4 Center Cable: Row 3 knit as 4/4 LC, K4; Row 9 knit as K4, 4/4 RC
For all sizes, the pattern indicates that you are to continue in pattern as established increasing 1 stitch in each of the center 14 purl sections every row 3 *2 more times*. I only increased once more so that I wouldn't end up with too much of a bell bottom to the sweater. It probably would have been ok in hindsight to have done both increases recommended, but I was cautious.
Last, the pattern did not specify how to do the slip stitches between the cable columns. After some trial and error I decided to slip knitwise with the yarn held in back.
Ravelry details here.


11 comments:
Fantastic--well done!
Hooray! It looks fabulous!
Woo hoo -- you did it!!! Once again, it looks amazing. I love how it's a little swingy at the bottom. I've never seen Cascade 220 look so springy and squishy before! What a perfect choice for that sweater. Well done!
It's absolutely beautiful and fabulous!! Kudos to you!
That is a gorgeous result, I love the way it drapes.
That's gorgeous!!! Fantastic job on your sweater!
That looks so much better on you than it ever would on me. Well done . . . love it!
i am in love with this sweater!!!!
it looks fantastic on you!
Wow, I am SO far behind in my reading. This is simply gorgeous on you!!!
That is gorgeous! I hope mine looks even half as nice.
Cora
Who knows where to download XRumer 5.0 Palladium?
Help, please. All recommend this program to effectively advertise on the Internet, this is the best program!
Post a Comment