Thursday, November 06, 2014

Ribbed Cowl

Hey everyone!

This week for the Harry Potter Knit and Crochet House Cup I decided to knit a long cowl from a single skein of Lion Brand Wool Ease Thick and Quick (a super bulky yarn). After much consultation with the DH (the cowl is for him), I got out my ruler, did some planning, and cast on. I think it came out well and thought I'd share since doesn't everyone have a single skein of super bulky yarn in need of a pattern?

This long cowl is started with a provisional cast on to keep the initial row of stitches live. The cowl is then worked back and forth along the width of the cowl (approximately 5"). Once the yarn is almost exhausted (for me this was at about 28" of length), the stitches from the provisional cast on are "made live" again and the two ends are Kitchener stitched together. For those of you who wish to skip the fancy provision cast on and Kitchener-ing, a regular cast on and cast off can be used and the two ends seamed together.

The cowl is heavily textured given the bulky yarn, provides good warmth, and should be appealing to males and females.

Ribbed Cowl

Materials:

one skein Lion Brand Wool Ease Thick and Quick (approx 106 yards) or a similar amount of another super bulky yarn
Size US 15 knitting needles (straights or circulars are fine)
tapestry needle to accommodate yarn size

Gauge:

approximately stitches per inch (but gauge does not need to be spot on)

Directions:

Use a provisional cast on (I like the one from Purl Bee at http://www.purlbee.com/2007/12/10/provisional-cast-on/ ) and cast on 15 stitches

Row 1: (K1, P1) repeat until one stitch remains, K1
Row 2: (P1, K1) repeat until one stitch remains, P1

Repeat rows 1 & 2 until yarn is almost exhausted (almost 28" for me), reserving enough yarn to use the Kitchener stitch to graft the two ends together.

Place the reserved 15 stitches from the provisional cast on back onto your needle (the stitches are "made live" again) and using the Kitchener stitch, graft the two ends of the cowl together, forming a long (approximately 28" ) narrow (approximately 5") loop. I use the instructions from Knitty.com to Kitchener, http://www.knitty.com/ISSUEsummer04/FEATtheresasum04.html.

The cowl can be worn long or doubled for greater warmth (as shown in the photo). It has the benefit of being two-sided (both sides can be public).

A quick and easy project, good for anyone (unisex) that provides nice warmth for a cold day!

Sunday, June 22, 2014

Felted Mini Drawstring Bag

For June's HPKCHC Potion's class, I wanted to do a small felted bag (a place to keep a house key tucked away). I decided to improvise. My pattern is provided here in case anyone wants to do something similar.

Felted Mini Drawstring Bag

Materials:

approx 11 grams of Paton's worsted wool yarn (or another feltable worsted weight yarn)

US 9 needles (either double point or a long circular to allow you to knit in the round)

CREATING THE BOTTOM (this will be a hexagon shape when you are done)

Cast on 8 stitches

Row 0. knit one row

Row 1. KFB, K to 1 stitch before marker, KFB (10 stitches)

Row 2. Knit all stitches

Row 3. KFB, K to 1 stitch before marker, KFB (12 stitches)

Row 4. Knit all stitches

Row 5. KFB, K to 1 stitch before marker, KFB (14 stitches)

Row 6. Knit all stitches

Rows 7-12: Knit all stitches

Row 13. SSK, K to 2 stitches before marker, K2tog (12 stitches)

Row 14. Knit all stitches

Row 15. SSK, K to 2 stitches before marker, K2tog (10 stitches)

Row 16. Knit all stitches

Row 17. SSK, K to 2 stitches before marker, K2tog (8 stitches)

Row 18. Knit all stitches

CREATING THE BODY OF THE BAG

Pick up and knit stitches around the base of the bag until you have 36 stitches on either DPNs or on a long circular set up to knit with magic loop - place markers after every 9 stitches with a different style of fourth marker to mark the end of row

Rows 1-6: Knit all stitches

Row 7: (Knit 7 stitches, K2tog) 4 times (32 stitches)

Row 8: Knit all stitches

Row 9: (Knit 6 stitches, K2tog) 4 times (28 stitches)

Row 10-11: Knit all stitches

Row 12: (Knit 5 stitches, K2tog) 4 times (24 stitches)

Row 13-14: Knit all stitches

Row 15: (Knit 4 stitches, K2tog) 4 times (20 stitches)

Row 16: Knit all stitches

Row 17: (K2tog, YO) 10 times (20 stitches)

Row 18-20: Knit all stitches

Cast off all stitches.

My bag after knit (before felting) was approximately 3 3/4 " tall, 2" wide at base, and 2" wide at base

To ensure that the eyelets at the neck of the bag stayed open during felting, I wove a small plastic bag through the openings

I put the bag into a pillowcase (pinned shut) and washed it in hot water in the washing machine along with a load of towels.

After felting, you can use a ribbon or single crocheted "rope" as the drawstring for your bag.

Sunday, April 20, 2014

Shetland Sampler Cowl

Back in May of last year (2013), I took a spinning class, Spinning the Colors of Shetland, taught by Nancy Barnett at the Middle Tennessee Fiber Festival in Dickson, TN. Nancy provided us with fiber in a number of different colors of Shetland.

As part of the Tour de Fleece later that year, I spun up all my Shetland and had a great sampler of yarns. I had eight different colors of Shetland, spun from rovings, short forward draw. The final yarn was a 2-ply, varying from DK to worsted weight.

With the goal of using this yarn for something other than just petting, I decided to knit up a cowl. I found a basic honeycomb pattern and improvised the pattern. I love having something as a final project which was started in the class. I share the pattern here for anyone else who might find him or herself in a similar circumstance with small quantities of several different colors of yarn (whether handspun or store bought).

Happy Knitting!

Shetland Sampler Cowl

Materials:

approximately 11 yards each of 7 colors (colors A - G) of a DK to worsted (9-10 wpi) weight yarn (approx 4 grams each for my 2-ply; my cowl includes colors A=white, B=grey, C=light grey, D=shaela, E=emsket, F=mioget, G=moorit) for a total of approximately 77 yards (28 grams) - these could be handspun or store-bought

approximately 90 yards of a main color (approx 32 grams for my cowl; my cowl includes black for the main color and I used KnitPicks Wool of the Andes Sport)

Needles: US 5 circular needles
US 7 circular needles for cast on and cast off (optional - used to help ensure edges aren't too tight)
or needles sized to obtain gauge

Gauge: 4 to 4.5 stitches per inch

Cast on 112 stitches using the main color with US 7 circular needles.
Join to knit in the round ensuring that your stitches are not twisted and use a marker for the beginning of the round.
Switch to the US 5 circular needles.

Row 1: Continuing with main color, Knit all stitches
Row 2: Purl all stitches
Row 3: Knit all stitches
Row 4: Purl all stitches
Row 5: Knit all stitches
Row 6: Purl all stitches
Row 7: Knit all stitches
Row 8: Knit all stitches

Row 9: With color A, (Slip2 as if to purl, Knit 6) repeat to end of row
Rows 10 - 14: Repeat Row 9
Row 15-16: With main color, Knit all stitches

Row 17: With color B, Knit 4, Slip 2 as if to purl, (K6, Slip 2) repeat until two stitches before end of row, Knit 2
Rows 18-22: Repeat Row 17
Rows 23-24: With main color, Knit all stitches

Rows 25-30: With color C, repeat Rows 9-14
Rows 31-32: With main color, Knit all stitches

Rows 33-38: With color D, repeat Rows 17-22
Rows 39-40: With main color, Knit all stitches

Rows 41-46: With color E, repeat Rows 9-14
Rows 47-48: With main color, Knit all stitches

Rows 49-54: With color F, repeat Rows 17-22
Rows 55-56: With main color, Knit all stitches

Rows 57-62: With color G, repeat Rows 9-14

Row 63: With main color, Knit all stitches
Row 64: Knit all stitches
Row 65: Purl all stitches
Row 66: Knit all stitches
Row 67: Purl all stitches
Row 68: Knit all stitches
Row 69: Purl all stitches
Row 70: Knit all stitches
Cast off using US 7 circular needles.

Wednesday, November 10, 2010

Francis Revisited


francis rev 1


So now that I'm going to commit to blogging again, I think it makes sense for me to start with my most recent finished object, Francis Revisited.


francis rev 4


Once I started to find my knitting mojo again, I pulled this pattern out of my "to knit" pile and cast on with yarn from my stash (Cascade Pastaza). What a bonus ... finding a pattern that would work for yarn I already had and like.

So mid-September I cast on and off I went. Earlier this year I learned the magic loop technique for socks (fodder for another post) and used that to do the sleeves. Let me tell you, sleeves have never been so painless.


francis rev 2


I have to say, you can't beat a top-down sweater knit in chunky yarn. It doesn't take a lifetime to finish ... instant gratification (or at least 6 week gratification in this case) is what I like!


francis rev 3


I used Cascade Pastaza for the sweater. I had a seen a few other people use this on ravelry. It was a great choice. I got gauge and I really like the slight halo I got from the lama content. I'm definitely shedding a little bit, but nothing like my part angora sweater (which I honestly should just frog so it stops taking up closet space).

Looking for a quick, easy sweater to get yourself going? Want something that looks soft and smooshy? You may want to try out this sweater in a nice fuzzy yarn.

My rating: Gold star!

Francis Revisited by Beth Silverstein
US 10 and 7 circulars (sleeves done magic loop)
Cascade Pastaza (6 skeins)
(50% lama, 50% wool)
Colorway: (lavendar) 300 (lot 8189)
Cast on September 16, 2010
Finished November 6, 2010 (funny... that's exactly one year after the last project I posted here on my blog... spooky!)

Mods: I did full length sleeves with no increases/decreases. I just knit straight down from the picked up stitches and then ended with 12 rows of seed stitch. I also did 12 rows of seed at the bottom of the sweater.

Ravelry details here.

Monday, November 08, 2010

A one year absence anniversary

Wow... one year! How the time has flown. Today, the anniversary of my last post, I feel compelled to post and to try to start blogging again.

to ply orange bfl fiber


Lots has been going on over the past year (and nothing too). Work has been crazy busy and that's the primary reason this blog has sadly been abandoned. Over the past few months I've slowly starting carving out a little time for recreation though. Interestingly, this has come less in the form of knitting and more in the shape of spinning! Yep, that wheel I bought some years back has been getting some exercise and I'm really loving it.

My last post showed that I finished the cinnamon bay bag. To be honest, finishing the blanket killed my knitting mojo for quite some time. Too much stockinette in the same color, over, and over, and over (and over). =]

mendenhall washed merino fleece


Switching into spinning, and then get this, actually knitting with my own yarn -- that my friends is inspirational! In later posts, I'll catch you up and show you some of what I've done.

Yesterday though was one of those great fun days (and spinning and fiber related). The Torrance Fiber Festival happened and I went with a great group of women (the Southern California Fiber Fiends on ravelry. We got to see and touch all kinds of beautiful fiber and yarn, had a great lunch, and got to laugh and talk about all kinds of great topics. I'm so glad they let me join them in all the fun. I came home all energized and excited about life.

And those feelings my friends certainly beat out stressed and demoralized (which is what I often get at work)!

Looking forward to posted here again in the near future.

p.s. today's lovely pictures are purchases from the festival this weekend. To-Ply's handpainted BFL roving in oranges and Mendenhall merino washed fleece. Goodies for future fun!

Sunday, November 08, 2009

Cinnamon Bay done


Yes friends, a near miracle ... I have finally finished a project again.

Between the craziness at work and the work at work I feel like there have been weeks in a row where I have knit not one stitch. About two weeks ago I decided I just had to finish my biggest UFO and went to the task.


I'm pleased to say that the Cinnamon Bay beach bag blanket is done and turned out pretty nicely.


Today was a beautiful day outside so we thought it would be great to take some photos and the dog and our outside kitty, Ricki, decide to help out.


Quite photogenic aren't they?


The idea of this blanket, knit from the center out, in the round, is that an i-cord drawstring runs through the edging and you can cinch it up into a bag. Nice idea if you want to use it as a beach blanket because it becomes one less thing to carry.


All in all, I'm pretty happy with this one. The jeannee is a pretty nice yarn and the color is really great. The final project looks quite nice too. The bad news, like any large blanket, it takes a long time. Not a great thing for me since I was so busy and then bored with miles of stockinette. I was never so glad to get to edging ... it was very exciting! I think this would be cute even knitted to a smaller size without the drawstring for a child.

Cinnamon Bay beach bag blanket by Carol Feller from Knitting in the Sun
US 8 dpns and circulars
Plymouth Yarn jeannee (about 16 balls)
(51% cotton, 49% acrylic)
Colorway: (lavendar) 0023 (lot 37841)
Cast on June 18, 2009
Finished November 6, 2009

Mods: Nothing major. I did stop a few rows short of the recommended number for the large size bag because I was worried I was going to run out of yarn. Turns out I had plenty.

Ravelry details here.

And time passes

It's amazing how quickly time can just get away with me. Every semester I say that time goes faster than in the previous year. This year, I really mean it!

Work is still crazy busy, me having said the word "yes" to far too many people and too many projects. I'd say Spring will be better, but I'd probably jinx myself. =]

Everyone around here is good... the whole animal kingdom: cats, dogs, chickens, and people all happy and content. And after ummm,, maybe 3 months, I finally have a finished project to show (next post).

First, let's have fun with the chickens shall we?

Monday, September 28, 2009

Life as normal (or not)


I'm taking life around here just like the chicks do ... one step at a time.

Life doesn't feel very normal right now. I actually feel like someone pressed the time and a half button. I have twice as many things to do these days and not so much time in which to get it all done. This of course makes for a lot of undone "to do" lists.

I am still trying to carve out time for myself, and the chickens, and the cats, and the dog (and of course the spouse ... that's a given... =]).

The hens (and they are now officially hens) have all started to lay now. Beatrice continues to lay almost every day (I think she's only missed about three days in the 3 weeks she's been laying). Ada and Bettina are still just getting started but seem to be getting into the habit. But man on man, are they loud in the morning. I knew roosters were loud but I had no idea that hens could make such a ruckus. That egg song phenomenon ... that's just part of the story. There's also all the agitation that happens before they lay and the chatter that happens when one's in a nesting box that another wants to get into. Crazy chicken talk I say!

Last weekend (not yesterday mind you, but a week ago), S and I took off one afternoon to catch a little down time. We needed to sooth our souls with the Pacific.


It was a great time to go. The marine layer started coming in so it was cool and overcast, almost foggy on the beach. The lights came on at Santa Monica pier while we were there too which made for a nice view. Ahh the ocean ... she is calming.

The other really nice thing S did for me was we went on a yarn visit when we were in Santa Monica. For the first time, I visited Wildfiber and WOW is this place great! The picture on their web page does not do the place justice! The yarns... the colors... the softness. I could have purchased a million things.


Instead I settled on one smallish purchase... some Manos is this fabulous green color. I'm not sure exactly what I'll make, but it's going to be great to knit with. It will be nice to get back to some wool. All summer I've been working on an endless stockinette stitch blanket in a lavendar cotton. I'm sure it's going to be nice when it's done, but it's past finished already. Luckily, I've only got 12 rows left ... now granted every row has about 700 stitches, but hey it's only 12 rows! Gotta look for the little things these days you know. =]

Monday, September 07, 2009

An encore


We were thrilled with the first egg. Today, Beatrice laid a second! Still the most dainty, cute little eggs. We got another "egg song" encore as well. Yesterday I read that this in not uncommon. Here's an example I found on you tube.


The joy!
Sunday, September 06, 2009

A month of good and bad

A month ... time certainly has raced past me over the past 30 days. Back from vacation and into the vortex of work. School started last week and the weeks prior to the start of school are always crazy. You know, everyone has to do everything that didn't get done the rest of the summer? I survived, only a little worse for wear.

Around here, we've had happy and sad events.

This morning we had a happy event which prompted me to post. Beatrice, our most "developed" girl, laid her first egg!


Here she is, the proud egg, layer shortly after the big event. We've been able to tell that she was almost ready to lay for the past couple of weeks (her crown and waddle have really come in and reddened up). The last couple of days she's been very noisy, so noisy I've started to worry that maybe we were wrong and she was really a rooster.

This morning, even before we opened up the house she was really loud. In fact, she was in the laying boxes when I went out to let them into the run. I could just tell today would be the day. She went out into the run for a few minutes and then went right back into the house. We heard lots of squaking and after one particularly loud bout, S wanted me to go out and check on her. The noises that came out of that girl for another minute were very loud exclamations. Then she scooted right out of the house, ran to the morning snacks, and left behind the cutest, most perfect, dainty little egg (pictured next to a regular grocery store egg in the picture below for comparison).


Instincts are really amazing. It has been fascinating to watch our girls go through the different stages of development and just seem to know what to do. We didn't put the laying boxes onto the house until they hit about 18 weeks (which is the earliest hens tend to lay) and Beatrice just went right in, checked it out, and seem to know just what it was for. The girls left it alone until this week and then I could tell Beatrice had been in there just checking it out, scratching a bit, nesting. Now she's a layer. Sigh ... where did the time go? My guess is we still have another week or two before another hen starts to lay.

Also, on the happy news side, we have another baby addition to the neighborhood ... a baby peacock.


The mom has lived in the neighborhood for quite some time. According to some neighbors, years (or another female at least has been here for years). I first saw her about a year ago on a morning walk. You never knew when you were going to see her, or what part of the neighborhood she'd be in, but it was always great to catch sight of her. About 2 weeks ago, driving home from work, I saw her walking in a yard along with her new little companion.

It's unclear to me whether she has an owner/caretaker in the neigborhood or if she really just lives wild in the neighborhood. I've seen lots of houses putting out water and feed for her. As far as I know, there is no male peacock in the neighborhood. There apparently was at one time, but no longer. So, either this girl is another immaculate mother or perhaps the fertilized egg was brought in for her (maybe by an owner?). It's a bit of a mystery, but a happy addition. I've only seen the pair three times so far, but every time is a treat.

Finally, some sad news. Earlier this week, we lost one of our own four girls. One of our reds, Althea, passed away. She just collapsed on Sunday morning last week, and despite a visit to the vet and some care, just didn't make it. We buried her under the budda and think of her often. We were quite worried that the other girls might also fall ill, but so far, no signs of any problems (and with Beatrice's delivery today I'm feeling more optimistic).


So we're remembering our lost friend and enjoying the companionship of the rest of our little family. Good and bad together... I guess that is how life is.

I hope everyone out there is enjoying the end of their summer and having a good labor day weekend.

Friday, August 07, 2009

Beaucolic Maine

Maine is a beautiful place. This past week we took our second vacation to the New England state, caught up with friends and enjoyed the quiet.

One of the big highlights of our trip this year was that we went to see and stay in friend SLO's new house (she's about 1 1/2 hours north of Portland on one of the coastal peninsulas).


She arrived at the house about a week before we did to move in and start to clean up. The house is 200+ years old and just adorable. She has water access, 5 wooded acres, and the house sits up on a bit of a hill surrounded by wildflowers. It is the most adorable thing ... makes me want to pick up and move to Maine. (Of course I realize I've only seen Maine in July and August and the winter is just a bit different). The ruralness of this part of the state is so appealing to me though ... very relaxing.


That lovely view is the meadow next to her house which she gets to look at outside her kitchen window. Pretty nice hmm?


That's S, another of our friends, and SLO after dinner one night.


Of course, I should disclose that our vacation included a bit of elbow grease too. We offered to help SLO paint the exterior of said 200 year old farmhouse. That picture is after we had finished ripping off the remainder of vinyl siding (the easy parts of which were removed about three years ago), taken down the guttering, and scraped off all the old paint. That scaffolding got moved around a lot and was the best tool we invested in all week!


After filling in all the holes in the wood, caulking all the seams of the house, replacing several clabbards, and priming, the house started coming together. After a good coat of paint, re-screened doors, replaced gutters and several other side projects we ended up with the beauty you see in the top picture. A beautiful home for sure!


Of course, no trip to Maine would be complete without lobster either!

S and I can't wait for our next trip!

Monday, July 27, 2009

Entrelac

When Lady Eleanor was making the rounds, I managed to miss the train. On Friday, some friends asked me if I could help them learn entrelac. I love to learn something new and help out, so off to the learning process I went. There are some good tutorials out there already (here and here) but I felt compelled to take photos of my process as I went along anyway.

Curious about how an entrelac scarf looks as we go along? It's kind of like sausage... you may not want to see the messy process but the outcome is all nice and tidy. And with that type of introduction....

I'm using Allison LoCicero's Entrelac Scarf pattern. Here's the process of my learning.

After casting on 24 stitches normally, you create three triangles to start. This serves as a bit of a set up "row".

One ...


This is where things are going to feel wierd to the newbie. You have 8 stitches caught up in the triangle and 16 stitches are just hanging out there doing nothing. Then it's time to do triangle Two ...


Now you start to see what's happening. You have little triange that are attached at the tail.

Then three ...


From here the patterns repeats two "tiers" over and over in alternation.

Tier 1 involves a triangle ...


then a square (or really more of a rectangle or parallelogram if you look closely) ...


then a second square ...


and then a final triangle...


You have a full width scarf now, but it doesn't really look like it. You really need to finish more to see the effect.

Tier 2 involves three squares knit one after the other, all the same...


Here's where I am with the starter triangle row, two Tier 1s, and two Tier 2s ...


You can definitely see the pattern clearly now and get a sense of what the final scarf will be like. An interesting technique with lots of depth.

It seems a little strange at the start with all the short rows and the incomplete sections (especially on the triangle row you start with and the first tier 1, but after you get the sense of where things are going, no difficulties. At first I had to pay alot of attention to when to turn and when not to, when I was to pick up and purl versus pick up and knit. Now, even after this little progress, it makes sense. I've even found myself not really needing to count rows. Once you know what's going on, the end of a square or triangle becomes obvious. The pattern is nice because you can follow the instructions literally until you get the idea then you can just use it as a reminder later.

Bring on the students!

Yarn: Plymouth Boku
Ravelry'd here

Saturday, July 25, 2009

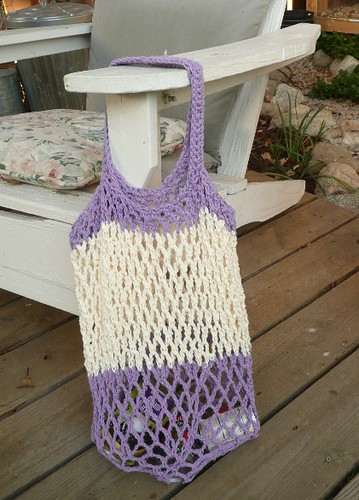
Crochet to the market

Yes my friends, I've engaged in crochet once again. I find it a nice diversion from my other knitting project right now which is miles, and miles (and did I mention miles) of stockinette stitch. Since that isn't all that exciting to show or talk about, I haven't blogged it yet. Hopefully it will look like something other than a blob before too much longer and will be blog worthy.


This stroll down the dark side came in the form of a market bag ... another easy beginner pattern.


After all, who ever has enough bags for produce from the farmer's market?


Crochet Grocery Bag by by Haley Waxberg
F 3.75 mm crochet hook
Lily Sugar'n Cream Solid
Colorway: hot purple and soft ecru
<1 skein of ecru and most of the skein of purple
Cast on July 17, 2009
Finished July 22, 2009

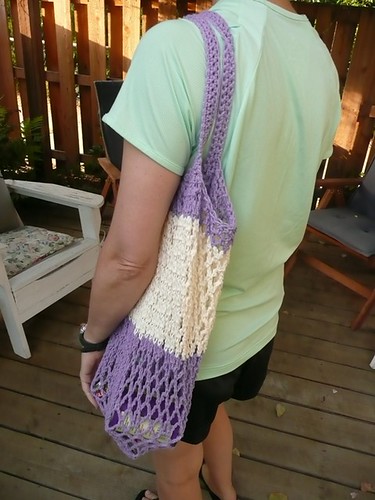
Mods: I accidently made more dcs into the initial circle and ended up with 10 spaces so I just kept with that which made the whole bag a bit wider (45 spaces at the widest). I also extended the handles to 44 chains so it would fit on my shoulder. Last, even though the pattern doesn't specify color changes, I used the ecru for rows 17-24 (of 28) for a bit of color contrast, rather than purple throughout.

Ravelry details here.

Monday, July 13, 2009

Hard work

Who said summer is a time for vacation? They lied. S and I have been doing too much hard work this summer. This weekend was definitely the most labor intensive weekend thus far this summer as we re-did our back patio.

When we first landscaped our yard, hmmm 3 years ago I guess, we jackhammered out an old ugly concrete patio and saved the concrete pieces to use like flagstones. We planted small ground cover between the stones. That looked great for a while ... but then the clover came. I don't know if you've ever had a clover invasion, but it takes over everything ... the ground cover didn't stand a chance. Once the plants and the clover were dead, we had dirt. Not very pretty. We've been talking about fixing this problem for some time and S decided this weekend it was time.

So first we removed all the concrete.


Then we added some sand and added all the concrete back.


Then we added more sand between the concrete.


Then we finished up with river stones between the concrete.


Thank god the final product looks decent, because it is hard work to carry, move, dump, spread, and otherwise manipulate concrete, sand, and stone. And did I mention that I got above 100 degrees F this weekend?


I'm ready to just sit around in the yard for awhile.

Thursday, July 09, 2009

Crochet... who me?


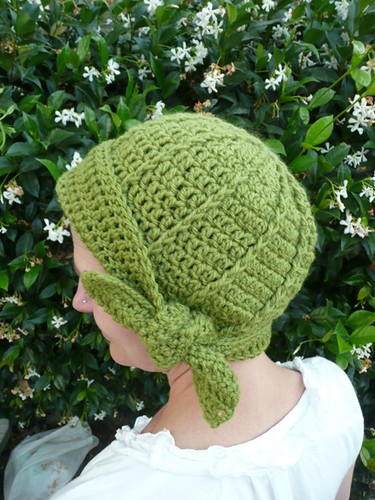
Yes me! Three weeks ago (wow, time does fly), the owner of my new favorite LYS, the PurlSide, had a crochet class. I've been wanting to learn to crochet so I could do just this hat, the Inauguration Chapeau, designed by a blogger I follow regularly, Ellen Bloom.


For my first ever crochet project, I'm pretty pleased with how this turned out! I had to rip back almost to the start the first time I began the hat just because of beginner's stupidity in interpreting the pattern (there are 12 posts -- vertical stripes that go from crown to brim on the hat... I amazingly turned that into 24 and had a very frilly placemat going for while!). With a little help from the girls at my weekly knit-night, I got back on track and a short time later had this divine little hat.

Thanks for such a super pattern Ellen!


Inauguration Chapeau by Ellen Bloom
US US 5 / 3.75 mm, US 6 / 4.0 mm, US 8 / 5.0 mm, and a US 9 / 5.5 mm crochet hook
Patons Classic Wool Merino
Colorway: leaf green
<1 skein
Cast on June 18, 2009
Finished July 6, 2009

Ravelry details here.

Sunday, July 05, 2009

Chicken coop city around here!

So as I mentioned in a previous post, last weekend the chicks made their big move from the house (inside) to the outside. That meant we had to take the four walls we had been using as an indoor coop, add to them a floor and roof, and, oh yeah, take it outside.


This is the house itself at the end of our first day of work. Cute I think. You can see the big door -- the people door -- that's for us to get in and out to clean the house and refill food and water. At the bottom left is where the pop door for the chickens is. In the picture above you can just see where the hole is; we actually have a flat door that slides in from the left to right to cover the door hole and close up the house.


After a second full day of work, we also had a run!


The idea here is that during the day the girls will have the "run" of both the house and the run and at night we'll be able to securely shut them up into the house to sleep.


You can see in this last picture that they are just as happy as can be in the run, scratching at the dirt. Dirt baths have become a BIG favorite around here too.


It was quite hard for me to actually move them outside. I really gained some appreciation for the concept of an empty nest. The first couple of nights I slept in the back room with the windows open so I could hear if they called out in distress. I'm happy to report though that they have taken to the outside like pros. They seem very happy with the extra room and like traveling back and forth between the house and run.

So our urban homestead seems to be in full swing now. Here we are, garden and chickens all residing next to our patio and deck. Gotta love it!